Criar VHD via PowerShell

Para esta tarefa usaremos o comando new-vhd, primeiramente vamos criar discos virtuais em formato VHD (para sistemas anteriores ao Windows 2012) e no formato VHDX ( para sistema 2012).Essa tarefa não será necessária se a VM a ser criada seja diskless para boot via PXE.

Exemplo 1

New-VHD -Path c:\Base.vhdx -SizeBytes 10GB

Neste exemplo será criado um disco virtual DINÂMICO no formato VHDX de 10GB na unidade C:

Observações:

• O tipo de disco será dinâmico porque no comando não foi especificado o tipo de disco, logo o padrão é dinâmico.
• A extensão do arquivo indica qual o formato do disco a ser criado VHDX ou VHD

Exemplo 2

New-VHD -ParentPath c:\Base.vhdx -Path c:\Diff.vhdx –Differencing

Neste exemplo será criado um disco virtual DIFERENCIAL no formato VHDX ,como o nome Diff.vhx  usando como disco pai o disco Base.vhdx

Observações:

• Esse tipo requer uma pequena quantidade de armazenamento físico quando ele é criado e requer mais armazenamento conforme o tamanho do disco cresce. O tamanho máximo de um disco diferencial é restrito pelo tamanho máximo do seu disco rígido pai.
• Bloqueie ou proteja o disco pai contra gravação antes de usar o disco diferencial. Caso contrário, se o disco pai for modificado por outros processos, qualquer disco diferencial relacionado a ele se tornará inválido e todos os dados gravados serão perdidos.

Exemplo 3

New-VHD -Path C:\fixed.vhd -Fixed -SourceDisk 2 -SizeBytes 1TB

Este exemplo cria um disco fixo de  1 TB em formato VHD no caminho especificado.

Observações:

• Os dados para o disco rígido virtual é preenchido a partir de outro disco identificado pelo sistema pelo numero 2.
• Você pode listar os discos conectados ao sistema e ao número associado a cada disco usando o comando Get-Disk

Exemplo 4

New-VHD -Path c:\LargeSectorBlockSize.vhdx -BlockSizeBytes 128MB -LogicalSectorSize 4KB -SizeBytes 1TB

Neste exemplo será criado um disco DINÂMICO de 1 TB com blocos de 128MB e setores de 4KB

• Gerenciar o tamanho de setores e blocos só é possível em discos no formato VHDX no formato VHD não é possível, estes valores assumirão os valores padrão.

Créditos: http://blog.astreinamentos.com.br/2013/04/gerenciando-maquinas-virtuais-no-hyper.html

Adicionar VHD à uma maquina virtual existente via PowerShell

Here’s an example showing its use on IDE:

<code>Add-VMHardDiskDrive -VMName <vm name>-ControllerType IDE -ControllerNumber 0 –Path "<vhd path and name>" -ComputerName <server></code>

Créditos:http://windowsitpro.com/hyper-v/q-what-windows-powershell-cmdlet-adds-vhd-virtual-machine-windows-server-2012

Desabilitando complexidade de senha no Hyper-V Server 2012

I recently experimented with Hyper-V 2012 and found there was no easy way to disable complex passwords, so after searching the net for a while I came across a nice solution that didn’t involve joining and leaving domains and interfering with group policy.  Here it is –
First step is to insert a USB stick and check which drive letter it is (D: in my case), then we can export our current policy:

secedit /export /cfg D:\new.cfg

Remove the USB stick and edit the file on another PC.  We are interested in PasswordComplexityvalue within the [System Access] section.

[System Access]
MinimumPasswordAge = 0
MaximumPasswordAge = 39
MinimumPasswordLength = 0
PasswordComplexity = 1
PasswordHistorySize = 0
...

Value should be changed to 0 in order to disable complexity check.

Save the file back, insert it back in to the Hyper-V server and import the configuration:

secedit /configure /db C:\Windows\security\new.sdb /cfg D:\new.cfg /areas SECURITYPOLICY

You can now add users with out complex passwords.

Créditos:http://sion-it.co.uk/tech/windows/disable-complex-password-requirement-on-hyper-v-server-2012/

Pesquisar e Desabilitar contas de Computador Inativas

Find all computers on the current domain with a name that starts with “wks” :

C:\> dsquery computer -name wks* -desc desktop*

Find all computers in the Aberdeen OU:

C:\> dsquery computer ou=Aberdeen,ou=Workstations,dc=ss64,dc=com

Echo all inactive computer accounts (more than 4 weeks inactive):

C:\> dsquery computer -inactive 4

Disable all inactive computer accounts (more than 4 weeks inactive):

C:\> dsquery computer -inactive 4 | dsmod computer -disabled yes

Créditos: http://ss64.com/nt/dsquery-computer.html

Remote Desktop over SSL

Installing a RDP SSL Certificate

1. On your Microsoft certificate authority server open the Certificate Templates console.

2. Duplicate the Computer template and use the Windows Server 2003 Enterprise format (Server 2008 v3 templates will NOT work).

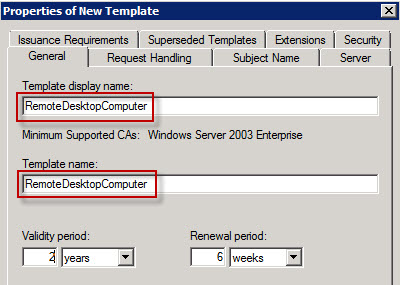
3. Change the template display name to RemoteDesktopComputer (no spaces). Verify the Template Name is exactly the same (no spaces). You can use a different name if you want, but both fields must match exactly.

4. Now we need to create an application policy to limit the usage to RDS authentication, then remove the other application uses for the certificate. On the extensions tab click on Application Policies then click on Edit.

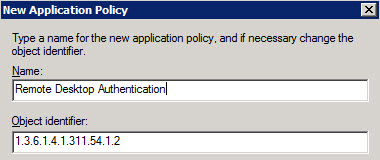
5. Click on Add, then click on New.  Set the value of Name to Remote Desktop Authentication. Change the object identifier to 1.3.6.1.4.1.311.54.1.2.

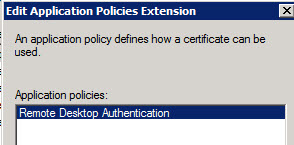
6. From the Application Policies list, select Remote Desktop Authentication.
7. Back on the certificate template properties, remove all other entries. Only Remote Desktop Authentication should be present.
8. If you wish, you can modify the validity period of the certificate, making it say two years instead of the default of one.
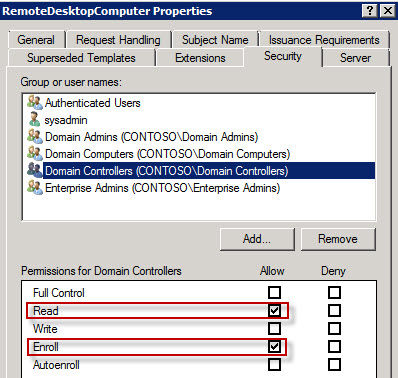
9. You probably want to secure your domain controllers as well, so for that we need to modify the security setting on the template. Open the Security tab and add the group Domain Controllersand give the group Read and Enroll (not Autoenroll).
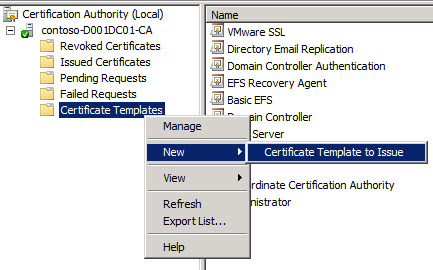
10. Open the MMC snap-in for managing your Certificate Authority and locate the Certificate Templates node. Right click, select New, then Certificate Template to Issue. Choose theRemoteDesktopComputer template.
11. Next up is configuring the GPO to utilize the new template. You can modify any GPO you wish, or create a new one. Obviously the scope of the GPO should cover any servers that you want to secure with TLS. This could be a server baseline GPO, domain GPO, or whatever you want.
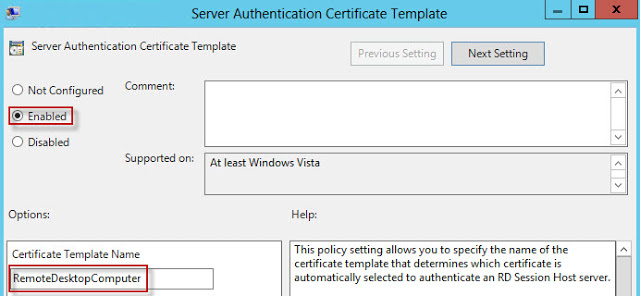
12. In the GPO editor locate the node Computer Configuration\Policies\Administrative Templates\Windows Components\Remote Desktop Services\Remote Desktop Session HostSecurity. Modify the Server Authentication Certificate Template setting. Enable the policy and enter the certificate template name that exactly matches what you created in your CA.

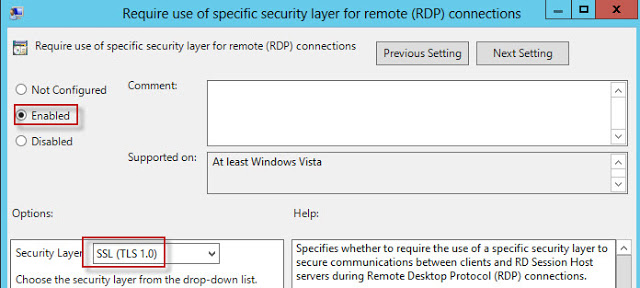
13. In the same GPO node, configure the Require use of specific security layer for remote (RDP) connections to use SSL (TLS 1.0).

14. Wait for the GPO to replicate, then refresh the GPO on a test server. Wait a minute, then open the Certificates MMC snap-in for the computer account. Look in the PersonalCertificates store for a certificate that has the Intended Purposes of Remote Desktop Authentication. If it’s not there, wait a minute, and refresh. If it never appears, something is wrong. Look at the gpresult to make sure your GPO is being applied to the server.

15. Once the certificate appears, double click on the certificate to open it. On the Details tab look at the first few characters of the thumbprint value and remember them.

16. To make sure the RDP service is aware of the new certificate, I restart the Remote Desktop Services service.

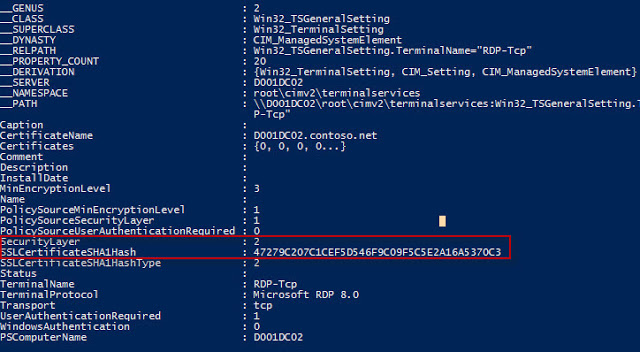
17. Open an elevated PowerShell prompt and run this command:

Get-WmiObject -class “Win32_TSGeneralSetting” -Namespace root\cimv2\terminalservices -Filter “TerminalName=’RDP-tcp’”

Validate that the Security Layer value is 2 and that the thumbprint matches the certificate. If both of those settings are correct, then you are good to go!

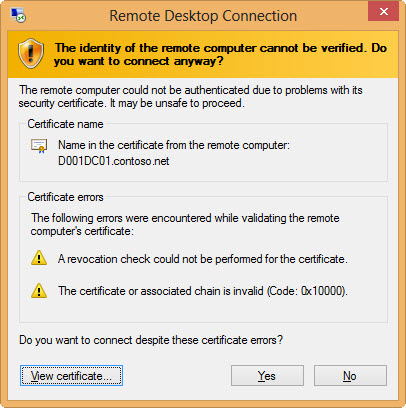
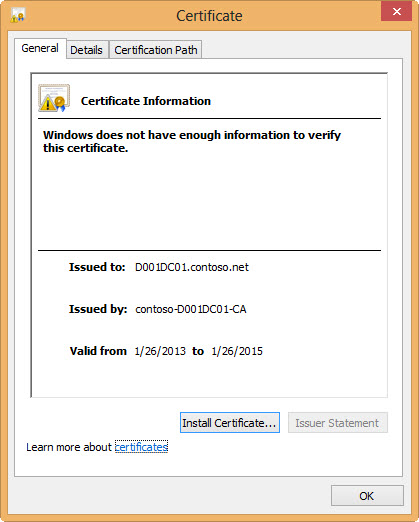
As a quick test I attempted to connect to this server from a non-domain joined computer that did not have the root certificate for my CA. I configured the RDP client to warn on any security issues. As expected, the client threw errors about the CRL not being available, and that it didn’t trust the chain. I also viewed the certificate and verified it was the correct one.

It seems Windows 8 has much more stringent certificate checking than Windows 7. The screenshots below are from Windows 7, in case you didn’t recognize the chrome. When using a Windows 7 non-domain joined computer to access the same TLS protected server, I got NO certificate warnings. That was even with the RDP 8 add-on hotfix. I’m glad to see Win8 does thorough certificate validation.

Connecting to the same server from a domain-joined computer that trusted the root CA resulted in no security warnings and a successful connection. If you look at a Wireshark capture you can also validate that CRL information is being exchanged between the computers, which means TLS is being used.

Créditos: http://www.derekseaman.com/2013/01/creating-custom-remote-desktop-services.html

Add USB Drive to Storage Device

This article describes how to add a USB Drive to Citrix XenServer as a Local Storage Repository.  This is tested on XenServer versions: 5.0, 5.5, 5.6.

  1. Plug in USB drive
  2. Open up the CLI console
  3. Check disks that are currently available:
    # fdisk -l
    Disk /dev/sdb is my 512mb usb drive
  4. Now to check what ID the harddrive has assigned. Change directory…
    # cd /dev/disk/by-id/
    …and list the disks:
    # ls
  5. Add the disk to the system:
    # xe sr-create type=lvm content-type=user device-config:device=/dev/disk/by-id/ usb-USB_Flash_Drive_AA04012700007933 name-label=”Local USB Storage”

Now you can see it in XenCenter and use it.

Créditos: http://blogs.citrix.com/2010/10/18/how-to-add-a-usb-drive-to-citrix-xenserver-as-a-local-sr-storage-repository/

Desabilitar Contas de Computador Antigas

Dsquery is a command-line tool that is built into Windows Server 2008. 
It is available if you have the Active Directory Domain Services (AD DS) server role installed. 
To use dsquery, you must run the dsquery command from an elevated command prompt. 
To open an elevated command prompt, click Start, right-click Command Prompt, and then click Run as administrator.

To find inactive computer accounts (number is inactivity in weeks):
dsquery computer -inactive 2

To find computers with stale passwords (number is stale in days)
dsquery computer -stalepwd 45

There is also a combination to disable / delete the accounts:
combined with dsmod/dsrm

dsquery computer -inactive 4 | dsmod computer -disabled yes
dsquery computer -stalepwd 45 | dsrm computer

You can get additional info on both of these tools with dsquery computer /? ,dsmod computer /?, and dsrm computer /?

Créditos: http://community.spiceworks.com/scripts/show/339-find-and-or-cleanup-old-computer-accounts-in-ad

Habilitar Porta 587

Some internet access providers have port 25 disabled in their routers to prevent spam. If you run your own mailserver in a datacenter, you might have to enable the submission port (587) in postfix to be able to send emails from your local email client to your own mailserver.

To enable port 587, edit the file /etc/postfix/master.cf

vi /etc/postfix/master.cf

and remove the # in front of the line:

#submission inet n – n – – smtpd

so that it looks like this:

submission inet n – n – – smtpd

and restart postfix:

/etc/init.d/postfix restart

Créditos: http://www.faqforge.com/linux/how-to-enable-port-587-submission-in-postfix/

Pegar IP HOSTS agendando

00-59/15 * * * * nslookup www.youtube.com | awk ‘/Address/&&!/#/{print $2}’ >> /etc/rc.d/youtube_hosts

Previnir SynFlood

echo 2048 > /proc/sys/net/ipv4/tcp_max_syn_backlog
echo 2 > /proc/sys/net/ipv4/tcp_syn_retries
echo 1 > /proc/sys/net/ipv4/tcp_synack_retries
echo 1 > /proc/sys/net/ipv4/tcp_syncookies

Créditos : http://foxpa.ws/2010/04/16/clearos-installation-checklist/