Xen storage repository supports IDE, SATA, SCSI and SAS drives when locally connected, apart from iSCSI, NFS, SAS and fiber channel in case of a remote storage.
Steps to create an SR in a XenServer.
1. SSH to the XenServer as root.
2. Find the disk ID of the new device using the following commands:
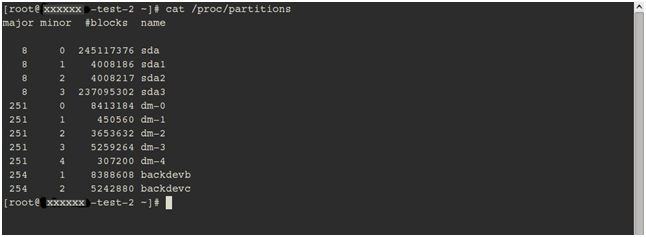
# cat /proc/partitions
You will see list of all the HDDs and partitions. Find which device is your new local disk. This is probably “sdx”(most probably sdb) or “/cciss/c0d1p0”.

# ll /dev/disk/by-id
This command will list the disk ids for all the partitions/HDDs present in the server as shown in the image below.

Find the disk ID of the “sdx” or “cciss/c0d1”disk. The “scsi-xxxxxxxxxxxxxxxxxxxxxxxxxxxxxx” or “cciss-xxxxxxxxxxxxxxxxxxxxxxxxxx”format is what you need.
3. Find out the ‘host-uuid’ in the XenSserver using the following command.
#xe host-list

The uuid (RO) is the ‘host-uuid’ you need.
4.Create a Storage Repository (SR):
# xe sr-create content-type=user device-config:device=/dev/disk/by-id/<scsi-xxxxxxxxxxxxxxxxxxxxxxxxx> host-uuid=<host-uuid> name-label=”Local Storage 2” shared=false type=lvm
– Or –
# xe sr-create content-type=user device-config:device=/dev/disk/by-id/<cciss-xxxxxxxxxxxxxxxxxxxxxxxxx> host-uuid=<host-uuid> name-label=”Local Storage 2” shared=false type=lvm
– Or –
# xe sr-create content-type=user device-config:device=/dev/<sdx> host-uuid=<host-uuid> name-label=”Local Storage 2” shared=false type=lvm
You can verify it from XenCenter with the following steps:
1. Connect to the XenCenter.
2. Go to the ‘Storage tab’. You will find the details of all storage repositories here. You can see the storage ‘Local Storage2’ in the list.
This signifies that the disk has been added successfully. Now, you can start creating VDIs on it.
Créditos : http://knowledgelayer.softlayer.com/questions/534/Adding+a+hard+drive+to+Citrix+XenServer

Deixe um comentário