Step 1: Rename ADDS Domain Name
1. Open Command Prompt in Administrator Mode
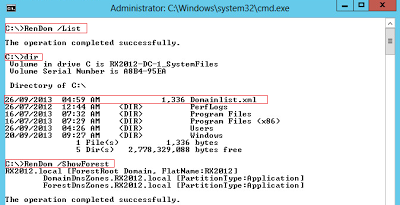
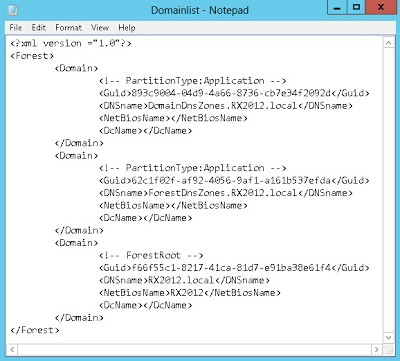
2. Execute ‘RenDom /List’ to generate Forest Naming Context in XML file
Execute ‘RenDom /ShowForest’ to view auto generated xml of current domain
3. Update the current domain name with new domain name and save the file
In this tutorial, rename domain name ‘RX2012’ to ‘RX1201’
4. Execute ‘RenDom /ShowForest’ to view the new domain name in xml file
5. Execute ‘RenDom /Upload’ to the domain name changes from xml file
6. Execute ‘RenDom /Prepare’ to start prepare domain name rename
7. Execute ‘RenDom /Execute’ to start domain name rename process.
After this process completed, the server will be automatically rebooted.
8. After the server reboots, pls take note to switch user to logon with new domain name
Step 2: Fix Up Group Policy After Domain Name Rename
1. After rename process completed, GPMC will need to be fix up to use the new domain name.
You will encounter the following error:
2. Execute two commands to fix GPMC (DNS & NetBIOS Name):
– Execute ‘gpfixup /OldDNS:<OLD_DOMAIN_NAME> /NewDNS:<NEW_DOMAIN_NAME>’
Step 3: Rename Server Domain
the old domain name
3. Restart server
Step 4: Finalize Domain Name Rename
Step 5: Fix DNS for new Domain Name
2. Open ‘File Manager’ and Navigate to ‘%WINDIR%\System32\Config’ and backup
DNS netlogon file as shown below
3. Delete the new zone created automatically during Rename Domain process
4. Create Two Active-Directory Primary Integrated DNS Forward Lookup Zone
5. Open Properties of new zone and set ‘Dynamic updates’ to ‘Secure Only’
6. Restore DNS Netlogon file into ‘%WINDIR%\System32\Config’
7. Restart ‘Active Directory Domain Services’ Service
8. Delete Old Domain Name DNS Zone as highlighted in red box.
9. Test DNS using DcDiag Tool
Execute ‘DcDiag /Test:DNS /DnsBasic’
Créditos: http://ylnotes.blogspot.com.br/2013/09/rename-active-directory-domain-name-for.html
Créditos: http://mizitechinfo.wordpress.com/2013/06/10/simple-guide-how-to-rename-domain-name-in-windows-server-2012/


Deixe um comentário