Archive for Windows Server

Recovery Windows 2008

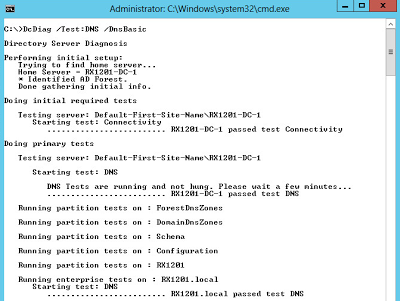
I would like to suggest you rename the current registry files and restore the registry files from the RegBack folder to troubleshoot the issue.

1. Insert the Windows Server 2008 R2 installation disc in the optical drive, and then restart the computer.
2. Press any key when you are prompted to restart from the disc.
3. When you are prompted, configure the Language to install, Time and currency format, and Keyboard or input method options that you prefer, and then click “Next”.
4. On the Install Windows page, click “Repair your computer”.
5. On the System Recovery Options page, click the version of the Windows Vista operating system that you want to repair, and then click “Next”.
6. On the System Recovery Options page, click “Command Prompt”.
7. Type the following command lines:

Cd  C:\windows\system32\config\
Ren  default  default.old
Ren  sam  sam.old
Ren  security  security.old
Ren  software  software.old
Ren  system  system.old
Cd  C:\windows\system32\config\regback\default
Copy  default  C:\windows\system32\config  /y
Copy  sam  C:\windows\system32\config  /y
Copy  security  C:\windows\system32\config  /y
Copy  software  C:\windows\system32\config  /y
Copy  system  C:\windows\system32\config  /y

8. Restart the computer

Créditos: http://mirrado.blogspot.com.br/2013/04/recuperar-windows-2008-r2-com-recovery.html

Exportar/Importar Configurações DHCP

Configuração do Servidor DHCP

netsh dhcp server \\FQDNdoservidor dump > dhcp.txt
netsh exec dhcp.txt


Reservas do Servidor DHCP

netsh dhcp server <serverIPAddress> scope <scopeAddress>  dump>dump.txt
netsh exec exportedreserv.txt

Licencias RDS no Windows 2012 com AD

To configure the license server on RDSH/RDVH:

$obj = gwmi -namespace “Root/CIMV2/TerminalServices” Win32_TerminalServiceSetting

$obj.SetSpecifiedLicenseServerList(“License.contoso.com”)

Note “License” is the name of the License Server in the environment

To verify the license server configuration on RDSH/RDVH:

$obj = gwmi -namespace “Root/CIMV2/TerminalServices” Win32_TerminalServiceSetting

$obj.GetSpecifiedLicenseServerList()

To change the licensing mode on RDSH/RDVH:

$obj = gwmi -namespace “Root/CIMV2/TerminalServices” Win32_TerminalServiceSetting

$obj.ChangeMode(value) – Value can be 2 – per Device, 4 – Per user

To validate the licensing mode:

$obj = gwmi -namespace “Root/CIMV2/TerminalServices” Win32_TerminalServiceSetting

$obj. LicensingType

$obj.LicensingName

Créditos: http://blogs.technet.com/b/askperf/archive/2013/09/20/rd-licensing-configuration-on-windows-server-2012.aspx

Renomear nome do Dominio Active Directory

Step 1: Rename ADDS Domain Name

1. Open Command Prompt in Administrator Mode

2. Execute ‘RenDom /List’ to generate Forest Naming Context in XML file
Execute ‘RenDom /ShowForest’ to view auto generated xml of current domain

3. Update the current domain name with new domain name and save the file
In this tutorial, rename domain name ‘RX2012’ to ‘RX1201’

4. Execute ‘RenDom /ShowForest’ to view the new domain name in xml file

5. Execute ‘RenDom /Upload’ to the domain name changes from xml file

6. Execute ‘RenDom /Prepare’ to start prepare domain name rename

7. Execute ‘RenDom /Execute’ to start domain name rename process.
After this process completed, the server will be automatically rebooted.

8. After the server reboots, pls take note to switch user to logon with new domain name

Step 2: Fix Up Group Policy After Domain Name Rename

1. After rename process completed, GPMC will need to be fix up to use the new domain name.
You will encounter the following error:

2. Execute two commands to fix GPMC (DNS & NetBIOS Name):
– Execute ‘gpfixup /OldDNS:<OLD_DOMAIN_NAME> /NewDNS:<NEW_DOMAIN_NAME>’

    – Execute ‘gpfixup /OldNB:<OLD_NETBIOS_NAME> /NewNB:<NEW_NETBIOS_NAME>’

Step 3: Rename Server Domain

1. After Domain Name Rename completed, the server domain info still reflects
the old domain name
2. Execute the following command to rename Computer Name:
    – NetDom COMPUTERNAME <OLD_FQDN> /Add:<NEW_FQDN>
    – NetDom COMPUTERNAME <OLD_FQDN> /MakePrimary:<NEW_FQDN>


3. Restart server

Step 4: Finalize Domain Name Rename

1. Execute ‘RenDom /Clean’ to remove domain rename status


2. Execute ‘RenDom /End’ to unfreeze Directory Services

Step 5: Fix DNS for new Domain Name

1. Open ‘DNS Manager’

2. Open ‘File Manager’ and Navigate to ‘%WINDIR%\System32\Config’ and backup
DNS netlogon file as shown below

3. Delete the new zone created automatically during Rename Domain process

4. Create Two Active-Directory Primary Integrated DNS Forward Lookup Zone

5. Open Properties of new zone and set ‘Dynamic updates’ to ‘Secure Only’

6. Restore DNS Netlogon file into ‘%WINDIR%\System32\Config’

7. Restart ‘Active Directory Domain Services’ Service

8. Delete Old Domain Name DNS Zone as highlighted in red box.

9. Test DNS using DcDiag Tool
Execute ‘DcDiag /Test:DNS /DnsBasic’


Créditos: http://ylnotes.blogspot.com.br/2013/09/rename-active-directory-domain-name-for.html
Créditos: http://mizitechinfo.wordpress.com/2013/06/10/simple-guide-how-to-rename-domain-name-in-windows-server-2012/

Conexão da Areá de Trabalho Remota não salva credenciais

Clique no botão Iniciar, Digite gpedit.msc e pressione ENTER.‌  Se você for solicitado a informar uma senha de administrador ou sua confirmação, digite a senha ou forneça a confirmação.

Em Configuração do Computador, clique duas vezes em Modelos Administrativos, emSistema e, por fim, em Delegação de Credenciais.

No painel direito, clique duas vezes em Permitir Credenciais Salvas com Autenticação de Servidor Somente NTML.

Na caixa de diálogo exibida, clique em Habilitado e em Mostrar.

Na caixa de diálogo Mostrar Conteúdo, clique em Adicionar, digite o nome do computador remoto (servidor) neste formato: TERMSRV/* e, em seguida, clique em OK.

Crédito: http://blog.douglasfilipe.com.br/2010/04/23/area-de-trabalho-remota-nao-salva-credenciais/

Diskpart

C:\> Diskpart

DISKPART> list disk
DISKPART> select disk (id)
DISKPART> online disk (if the disk is not online)
DISKPART> attributes disk clear readonly
DISKPART> clean
DISKPART> convert mbr (or gpt)
DISKPART> create partition primary
DISKPART> select part 1
DISKPART> active (if this is the boot partition)
DISKPART> format fs=ntfs label=(name) quick
DISKPART> assign letter (letter)
DISKPART> list volume

Créditos: http://www.jwgoerlich.us/blogengine/post/2009/11/05/Use-Diskpart-to-Create-and-Format-Partitions.aspx

Event ID Desligamento Windows Server

Abra o EventViewer,  Windows Logs, e clique com o botão direito sobre System, selecionandoFilter Current Log. Pode selecionar todos os Event Level e no campo de Event ID digite 1074, 1076.

Habilitar gerenciamento remoto Hyper-V Server 2012

  1. Enable remote config (sconfig.cmd option 4)
  2. Add a local administrator  (sconfig.cmd option 3)
    1. with same username and password as you are using on the Windows 8 Client
    2. with other username and password (on client you need to use

      cmdkey /add:<ServerName> /user:<UserName> /pass:<password>

For other remote admin like Event Viewer, Volume Management etc. some firewall rules need to be enabled:

netsh advfirewall firewall set rule group=”Remote Administration” new enable=yes
netsh advfirewall firewall set rule group=”File and Printer Sharing” new enable=yes
netsh advfirewall firewall set rule group=”Remote Service Management” new enable=yes
netsh advfirewall firewall set rule group=”Performance Logs and Alerts” new enable=yes
Netsh advfirewall firewall set rule group=”Remote Event Log Management” new enable=yes
Netsh advfirewall firewall set rule group=”Remote Scheduled Tasks Management” new enable=yes
netsh advfirewall firewall set rule group=”Remote Volume Management” new enable=yes
netsh advfirewall firewall set rule group=”Remote Desktop” new enable=yes
netsh advfirewall firewall set rule group=”Windows Firewall Remote Management” new enable=yes
netsh advfirewall firewall set rule group=”windows management instrumentation (wmi)” new enable=yes
sc config vds start= auto
net start vds

(for readonly remote device manager I enabled GPO “Allow remote access to the Plug and Play interface”, but still got an error trying to open a remote device manager)

For the Windows 8 Client

  1. Install Hyper-V Client Tools using “Turn Windows Feature on or off” (win-Q, search on “control panel”, etc.)
  2. Start component services config (win-Q, search on “DCOMCNFG”, right click and select “Run as administrator”
  3. Select “Console Root > Component Services > Computers > My Computer”
  4. Right click and select properties
  5. Select the tab “COM Security”
  6. Click on “Edit Limits” for the Access Permissions
  7. Allow remote access by setting the checkmark for the “ANONYMOUS LOGON”

For other remote admin like Event Viewer, Volume Management etc. you also need to open firewall on client using script above.

Tested this on the RC version of both server and client.

Créditos: http://publicjotting.blogspot.com.br/2012/06/hyper-v-server-2012-and-remote-hyper-v.html

Criar VHD via PowerShell

Para esta tarefa usaremos o comando new-vhd, primeiramente vamos criar discos virtuais em formato VHD (para sistemas anteriores ao Windows 2012) e no formato VHDX ( para sistema 2012).Essa tarefa não será necessária se a VM a ser criada seja diskless para boot via PXE.

Exemplo 1

New-VHD -Path c:\Base.vhdx -SizeBytes 10GB

Neste exemplo será criado um disco virtual DINÂMICO no formato VHDX de 10GB na unidade C:

Observações:

• O tipo de disco será dinâmico porque no comando não foi especificado o tipo de disco, logo o padrão é dinâmico.
• A extensão do arquivo indica qual o formato do disco a ser criado VHDX ou VHD

Exemplo 2

New-VHD -ParentPath c:\Base.vhdx -Path c:\Diff.vhdx –Differencing

Neste exemplo será criado um disco virtual DIFERENCIAL no formato VHDX ,como o nome Diff.vhx  usando como disco pai o disco Base.vhdx

Observações:

• Esse tipo requer uma pequena quantidade de armazenamento físico quando ele é criado e requer mais armazenamento conforme o tamanho do disco cresce. O tamanho máximo de um disco diferencial é restrito pelo tamanho máximo do seu disco rígido pai.
• Bloqueie ou proteja o disco pai contra gravação antes de usar o disco diferencial. Caso contrário, se o disco pai for modificado por outros processos, qualquer disco diferencial relacionado a ele se tornará inválido e todos os dados gravados serão perdidos.

Exemplo 3

New-VHD -Path C:\fixed.vhd -Fixed -SourceDisk 2 -SizeBytes 1TB

Este exemplo cria um disco fixo de  1 TB em formato VHD no caminho especificado.

Observações:

• Os dados para o disco rígido virtual é preenchido a partir de outro disco identificado pelo sistema pelo numero 2.
• Você pode listar os discos conectados ao sistema e ao número associado a cada disco usando o comando Get-Disk

Exemplo 4

New-VHD -Path c:\LargeSectorBlockSize.vhdx -BlockSizeBytes 128MB -LogicalSectorSize 4KB -SizeBytes 1TB

Neste exemplo será criado um disco DINÂMICO de 1 TB com blocos de 128MB e setores de 4KB

• Gerenciar o tamanho de setores e blocos só é possível em discos no formato VHDX no formato VHD não é possível, estes valores assumirão os valores padrão.

Créditos: http://blog.astreinamentos.com.br/2013/04/gerenciando-maquinas-virtuais-no-hyper.html

Desabilitando complexidade de senha no Hyper-V Server 2012

I recently experimented with Hyper-V 2012 and found there was no easy way to disable complex passwords, so after searching the net for a while I came across a nice solution that didn’t involve joining and leaving domains and interfering with group policy.  Here it is –
First step is to insert a USB stick and check which drive letter it is (D: in my case), then we can export our current policy:

secedit /export /cfg D:\new.cfg

Remove the USB stick and edit the file on another PC.  We are interested in PasswordComplexityvalue within the [System Access] section.

[System Access]
MinimumPasswordAge = 0
MaximumPasswordAge = 39
MinimumPasswordLength = 0
PasswordComplexity = 1
PasswordHistorySize = 0
...

Value should be changed to 0 in order to disable complexity check.

Save the file back, insert it back in to the Hyper-V server and import the configuration:

secedit /configure /db C:\Windows\security\new.sdb /cfg D:\new.cfg /areas SECURITYPOLICY

You can now add users with out complex passwords.

Créditos:http://sion-it.co.uk/tech/windows/disable-complex-password-requirement-on-hyper-v-server-2012/